
This post explains the basic process for setting up React Navigation on React Native. I am using the newest version of React Nav at the time of writing which is v6. I’ll be doing it on an Android emulator but you can do it on IOS or a physical device. Whatever you prefer!
Setting Up Development Environment
You need to set up your development environment by following this official documentation, or numerous tutorials on the web:
https://reactnative.dev/docs/environment-setup
The link above suggests using Android Studio’s emulator, but I’ve found it slow and difficult to use so I am trying out Genymotion emulator which is free for personal use.
Set Up a new Project
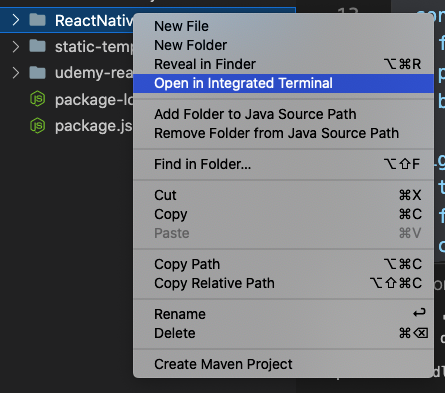
Once you have your environment set up, you can create a new React Native application. You can do this from the command line on your machine or if you’re using a code editor like Visual Studio Code you can open an integrated terminal. Do this by selecting Terminal > New terminal from the main menu, or right clicking on a directory in your document tree and select “Open in Integrated Terminal”.
To create a new project, run:
npx react-native init ReactNativeNavigationGrab yourself a cup of joe, because there’s a lot going on here and it takes a while to finish running. While you’re drinking it, you can familiarise yourself with the React Native Navigation doco or read on below about the concept of stack navigation.
A bit about stack navigation
We’re using stack navigation today. That’s different to draw and tab navigation. In stack navigation, as the name suggests, screens are stacked on top of the stack. So, you start on the app home page, but you decide to read about the app on the about page, so you click the About button. Under the hood, react navigation stacks About on top of Home (and just for fun, I’ve decided to draw this out by hand on some old paper I have lying around rather than opening up sketch):
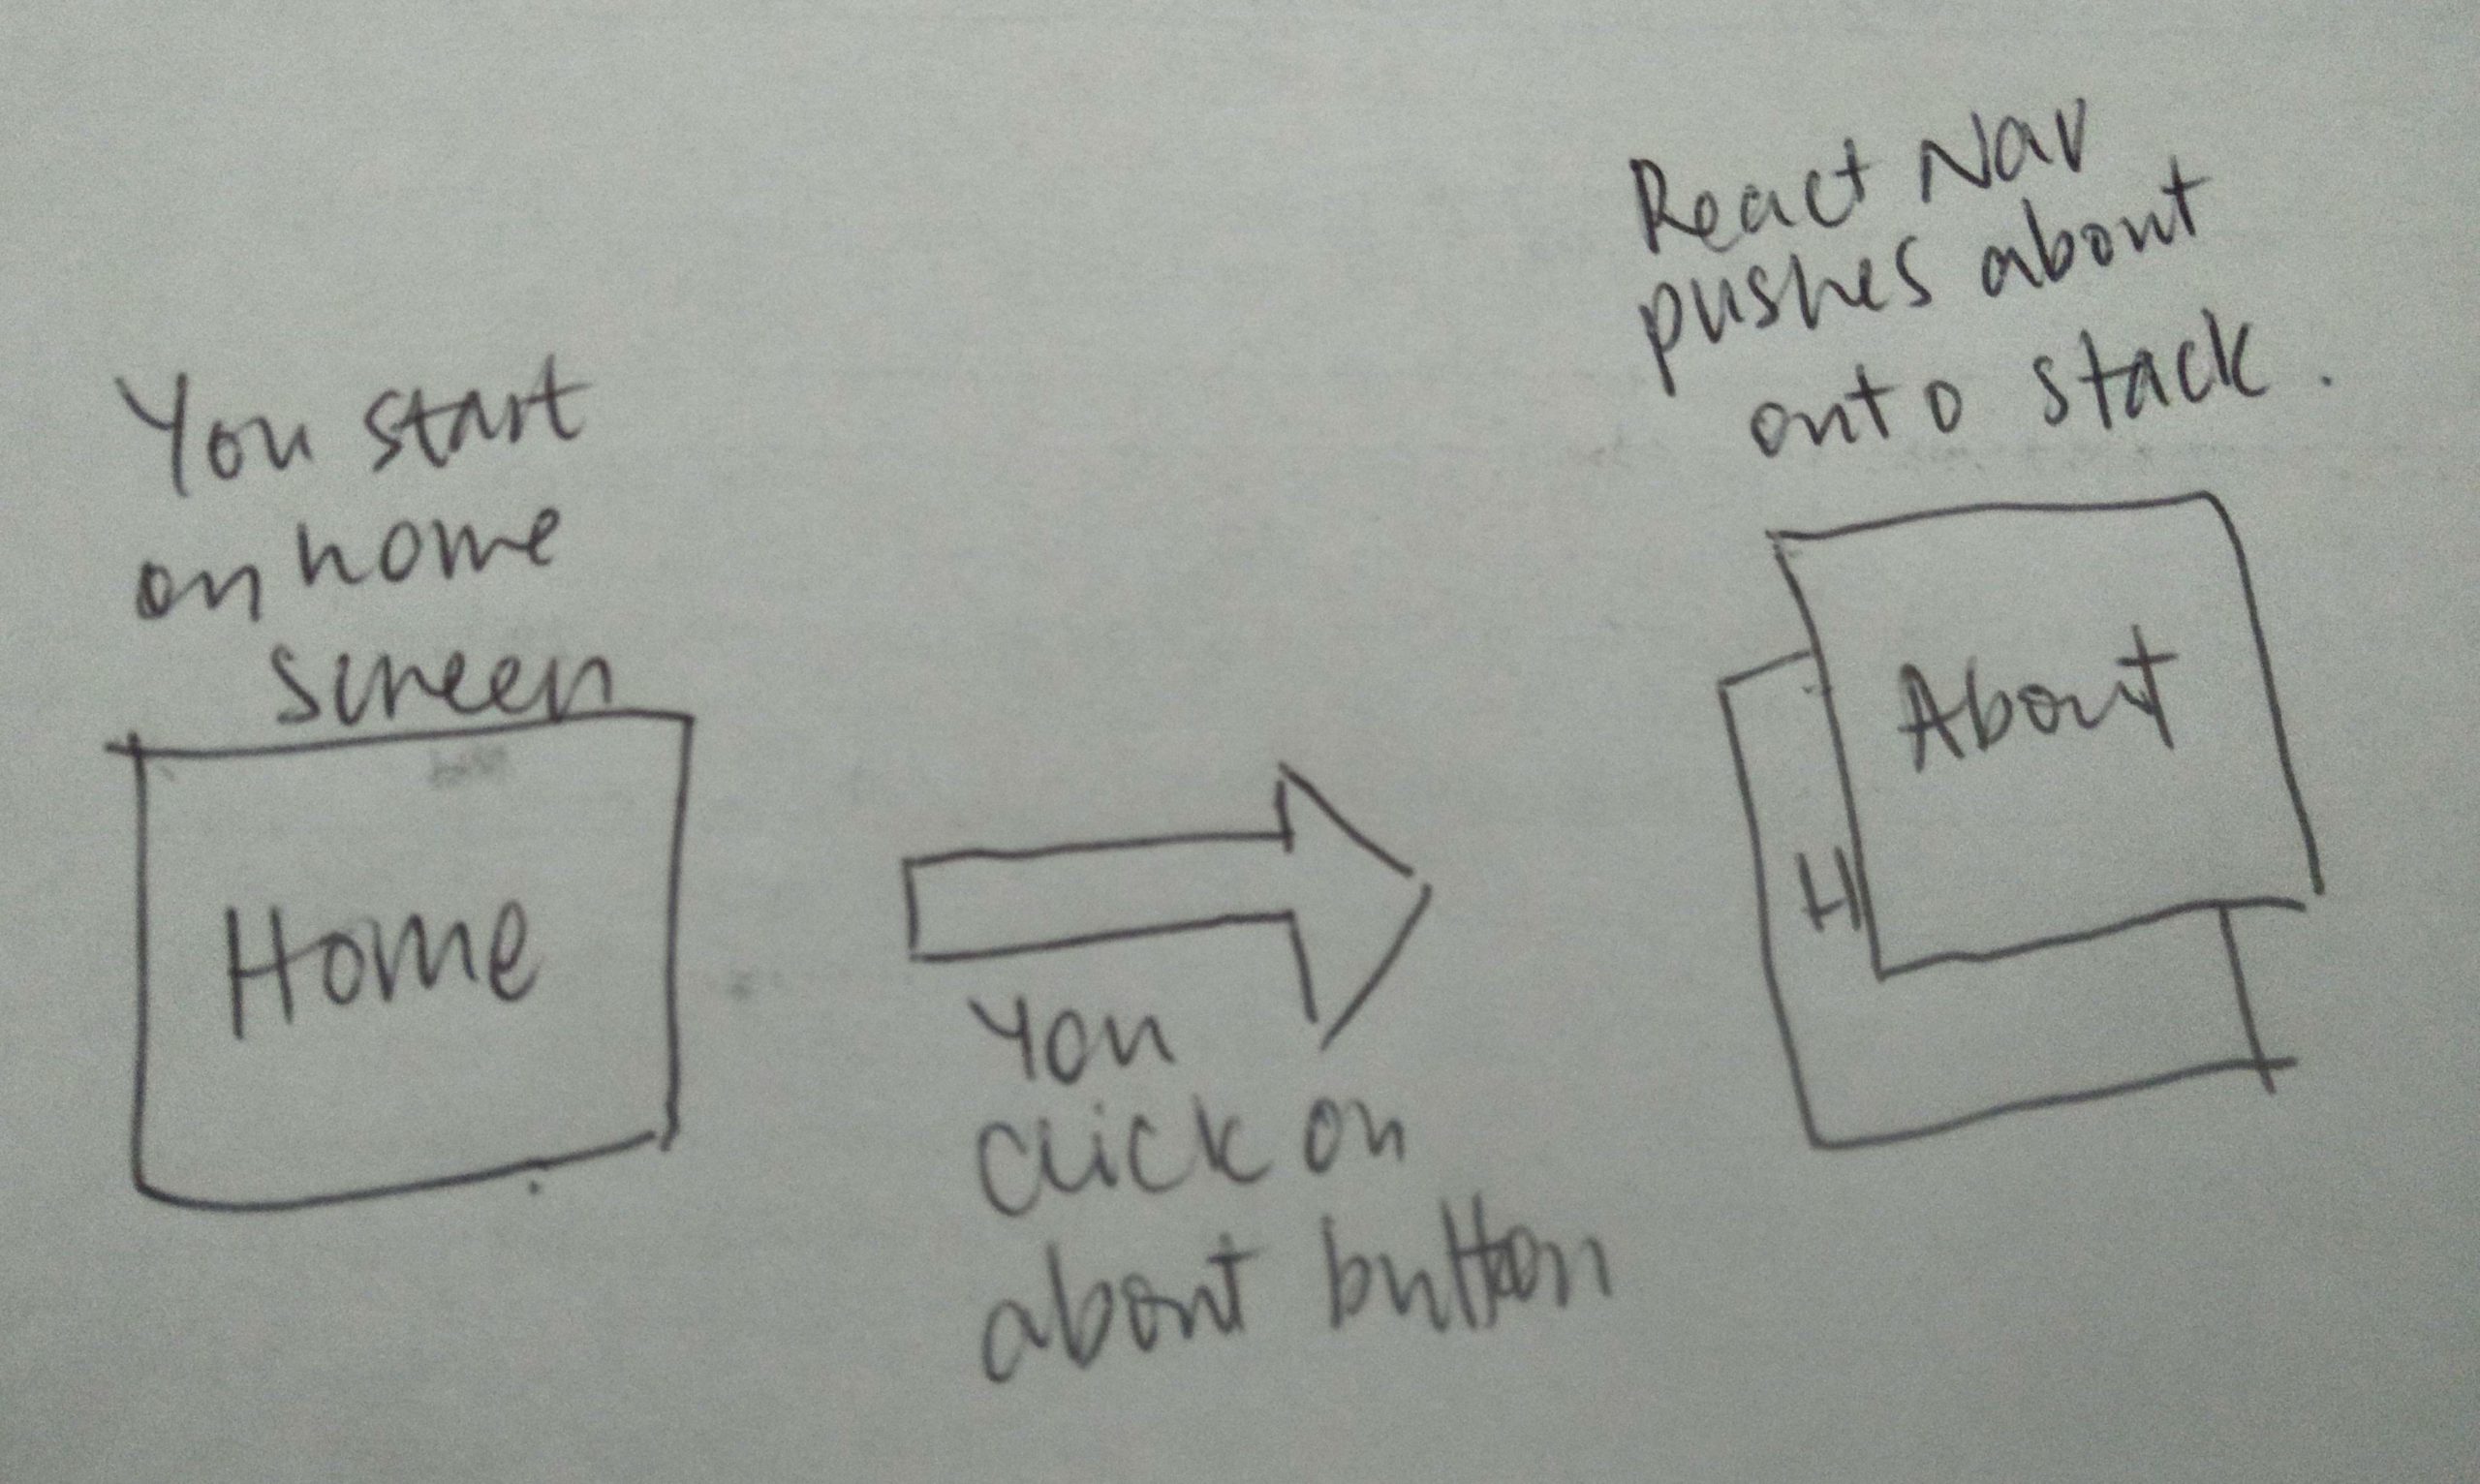
If you were to go on to another page it would be pushed on top of the stack too.
If you hit the back button, the current screen is popped off the stack:
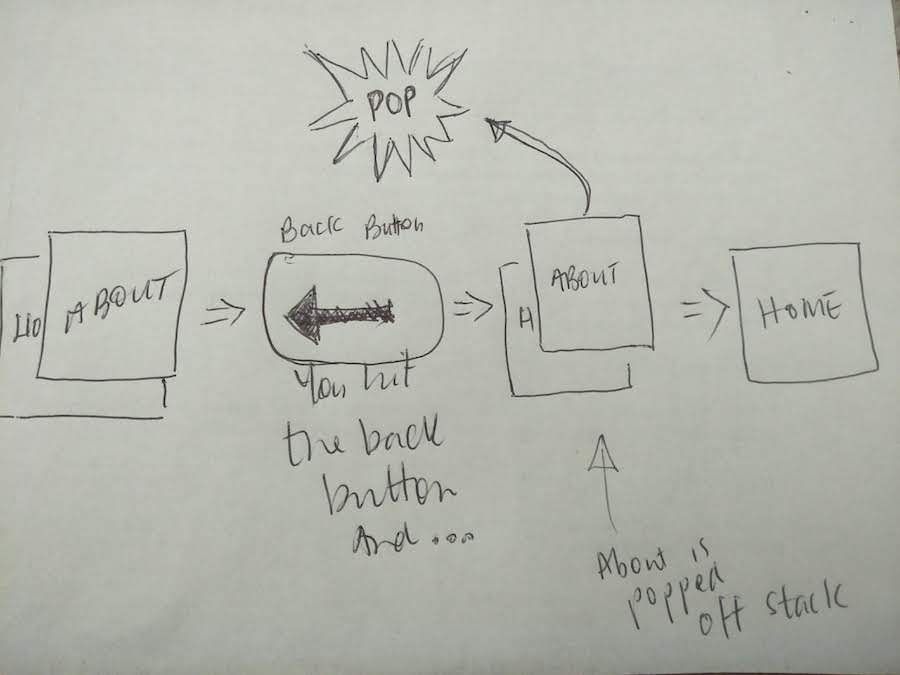
I hope you can see from this pretty mad drawing that initially Home, and then About are stacked on the stack. When you hit the back button, About is popped off, leaving just Home on the stack. I feel like I should have coloured this in with bright red and yellow, like a comic.
Install React Native Navigation and its Dependencies
Now we’ll install React Native Navigation and its dependencies. This part is straight out of the React Native Nav documentation. I am using npm, but you can choose to use yarn if you like. We are using a bare React Native project, so expo is not applicable here. First, cd into your project directory:
cd ReactNativeNavigation/Then install the navigation itself:
npm install @react-navigation/nativeThen the dependencies:
npm install react-native-screens react-native-safe-area-contextAndroid Specific Step
OK, the dependencies are installed now, but that’s not the end of it. For Android you need to add some code to the MainActivity.java file. It’s buried in
android/app/src/main/java/<your package name>/MainActivity.javawhere the “android” directory is in the root of your project.
If you followed my “Set up a new project” step to the letter that’ll be:
android/app/src/main/java/com/reactnativenavigation/MainActivity.javaAt the top of the file near all the import statements, add this:
import android.os.Bundle;And in the body of the function, add this:
@Override
protected void onCreate(Bundle savedInstanceState) {
  super.onCreate(null);
}
My MainActivity file looks like this now:
package com.reactnativenavigation;

import com.facebook.react.ReactActivity;
import com.facebook.react.ReactActivityDelegate;
import com.facebook.react.ReactRootView;
import android.os.Bundle;

public class MainActivity extends ReactActivity {

  /**
   * Returns the name of the main component registered from JavaScript. This is used to schedule
   * rendering of the component.
   */
  @Override
  protected String getMainComponentName() {
    return "ReactNativeNavigation";
  }

  /**
   * Returns the instance of the {@link ReactActivityDelegate}. There the RootView is created and
   * you can specify the rendered you wish to use (Fabric or the older renderer).
   */
  @Override
  protected ReactActivityDelegate createReactActivityDelegate() {
    return new MainActivityDelegate(this, getMainComponentName());
  }

  public static class MainActivityDelegate extends ReactActivityDelegate {
    public MainActivityDelegate(ReactActivity activity, String mainComponentName) {
      super(activity, mainComponentName);
    }

    @Override
    protected ReactRootView createRootView() {
      ReactRootView reactRootView = new ReactRootView(getContext());
      // If you opted-in for the New Architecture, we enable the Fabric Renderer.
      reactRootView.setIsFabric(BuildConfig.IS_NEW_ARCHITECTURE_ENABLED);
      return reactRootView;
    }

    @Override
    protected void onCreate(Bundle savedInstanceState) {
      super.onCreate(null);
    }

  }
}
iOS specific step
This is where, if you’re building for iOS, you need to install pods. The React Navigation documentation says you need run this install command:
npx pod-install iosInstalling the Stack Navigation Library
Lastly, like I said, we’re using stack navigation here. Each navigation type is contained in its own library, so we need to install the one for stack navigation:
npm install @react-navigation/native-stackNow we can start the fun part – coding!
Coding the basic App
Fire up your Android Emulator and execute the following from the root of your project:
npx react-native run-androidIt’s possible you’ll have time to make yourself another coffee at this point.
Now to begin with I’m going to clear out the unnecessary stuff in my App.js file. Rather than telling you all the bits I’ve removed, I’m just going to paste here what I’m left with and you can copy it into your own file:
import React from 'react';
import { StyleSheet, Text, View } from "react-native";

const App = () => {

  return (
    <View style={styles.container}>
      <Text style={styles.bigTextCenter}>We're making navigation!</Text>
    </View>
  );
};

const styles = StyleSheet.create({
  container: {
    flex: 1,
    padding: 24,
    backgroundColor: 'lightblue'
  },
  bigTextCenter: {
    textAlign: 'center',
    fontSize: 25,
    color: 'white',
  }
});

export default App;
A Quick Breakdown of the App.js Code – skip it if you know this stuff
I’ve just put some stuff in there so you can see it’s working on your screen. The code uses React Native core components View and Text. Both are imported from the “react-native” library.
Everything in the return statement in React Native must be contained in an enclosing element. That’s what View is doing here. And view is stylable with flexbox – Yay! Text is displaying text. 🤷🏻♀️
For the styles, you can see that I’m using camel case for property names and wrapping their values in quotes unless they’re integers, in which case, they’re just integers. That’s how you do it in React Native, unlike regular CSS.
Also that stylesheet object at the very bottom that has been created by StyleSheet.create and stored in the styles constant can just be accessed with dot notation like “styles.bigTextCenter”.
All core components in React Native receive a style prop and you can use it to style an element:
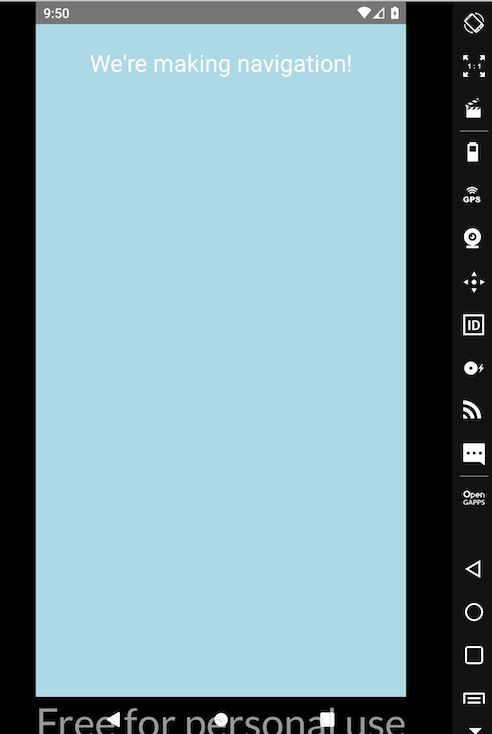
<Text style={styles.bigTextCenter}>We're making navigation!</Text>Properties like padding and font-size that are numeric in css don’t take a px. They are plain integers. I know this for sure because I literally just made that mistake while writing code and it broke everything! Old habits die hard.
Anyway, if all’s gone well, your screen should look like this:
Screens
Now we need a couple of screens to navigate between. I’m going to create Home and Settings.
First create a directory named ‘src’ (for source) in the root of your project. You can call it what you want, but src is common. Then create two files in that directory called HomeScreen.js and SettingsScreen.js. Later you might want to put them in a ‘screens’ directory but for now we don’t have much code so I’m going to leave them where they are.
My code for Home is like this:
import React from 'react';
import {View, Text, StyleSheet} from 'react-native';

const HomeScreen = () => {
  return (
    <View style={styles.container}>
      <Text style={styles.bigTextCenter}>Home Screen</Text>
    </View>
  )
}
const styles = StyleSheet.create({
  container: {
    flex: 1,
    padding: 24,
    backgroundColor: 'lightblue'
  },
  bigTextCenter: {
    textAlign: 'center',
    fontSize: 25,
    color: 'white',
  }
});

export default HomeScreen;
It’s nearly the same as the code in App.js but that’ll change in a sec. You can copy the Home screen code into Settings as well and replace every instance of the word ‘Home’ with ‘Settings’. I’ve also changed the background colour on Settings to salmon to be able to easily differentiate the screens when we start navigating between them.
We’re going to import those two screens into App.js for use later, so add these two imports at the top of App.js with the other imports:
import HomeScreen from './src/HomeScreen';
import SettingsScreen from './src/SettingsScreen';
Coding the Navigation
React Native Navigation is wrapped in a navigation container which manages the navigation state. We need to import it from the React Navigation library. So place this import at the top of App.js:
import { NavigationContainer } from '@react-navigation/native';We can then create the stack object using a special function called createNativeStackNavigator which is part of the Stack Navigation library. The two properties of this object – Screen and Navigator – can be used inside the Navigation Container to build our navigation. So add this import to App.js as well:
import { createNativeStackNavigator } from '@react-navigation/native-stack';Now in the App function of the App.js file, we can create the stack object and store it in the constant ‘Stack’:
....

const App = () => {

  const Stack = createNativeStackNavigator(); // <= this is the line you're adding

  return (

....
The next step is to create the navigation itself. We’re going to replace all the existing stuff that is in the return clause of the App.js file with the navigation container component and the Stack object components. You can replace the whole return clause with this:
  return (
    <NavigationContainer>
      <Stack.Navigator>
        <Stack.Screen name="Home" component={HomeScreen} />
      </Stack.Navigator>
    </NavigationContainer>
  );
So in the above you can see the NavigationContainer in use, wrapping all the navigation components. Inside that we are accessing the Navigator property of the Stack object that we just created. And then inside that we are using the Screen property of that same object to set up a route for our home screen.
For now, my entire App.js file looks like this:
import React from 'react';
import { StyleSheet, Text, View } from "react-native";
import HomeScreen from './src/HomeScreen';
import SettingsScreen from './src/SettingsScreen';
import { NavigationContainer } from '@react-navigation/native';
import { createNativeStackNavigator } from '@react-navigation/native-stack';

const App = () => {

  const Stack = createNativeStackNavigator();

  return (
    <NavigationContainer>
      <Stack.Navigator>
        <Stack.Screen name="Home" component={HomeScreen} />
      </Stack.Navigator>
    </NavigationContainer>
  );
};

const styles = StyleSheet.create({
  container: {
    flex: 1,
    padding: 24,
    backgroundColor: 'lightblue'
  },
  bigTextCenter: {
    textAlign: 'center',
    fontSize: 25,
    color: 'white',
  }
});

export default App;
And now.. the main screen of our app looks wildly different:
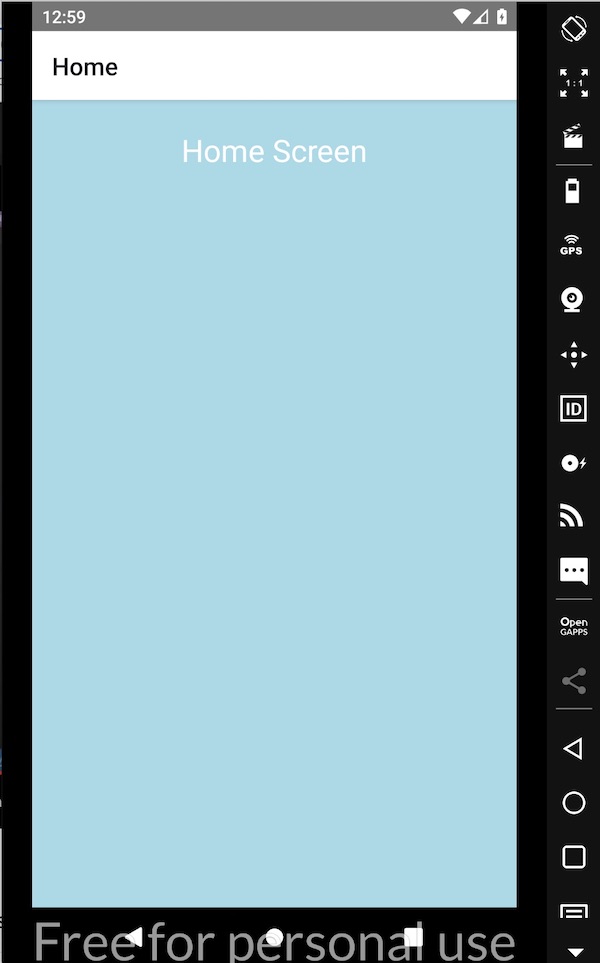
That’s right, it’s showing the Home screen and it has a top bar that is showing the name of the screen. The label on the top bar and the Home screen itself are being created by this line:
<Stack.Screen name="Home" component={HomeScreen} />The ‘name=”Home”‘ property is what’s setting the label. You could change the value, save and recheck the app screen and you’ll be able to see that the label “Home” has changed.
The component property is pointing at the Home screen import we did way back when we created the screens. Here it is again:
import HomeScreen from './src/HomeScreen';So you can see that the value of component is the same as the variable name in the import statement and that’s how the navigation knows it should be showing the Home screen.
Now we can just copy that Stack.Screen line and set some new values for it to show the Settings screen. Add this line below the existing Stack.Screen line:
<Stack.Screen name="Settings" component={SettingsScreen} />NOTE: I’m now going to remove the styles from the bottom of App.js because we no long need them (we’ve taken out the bit of code where they were being used). So remove the whole const “styles = StyleSheet.create({ … });” section of the code from App.js.
My whole App.js file again:
import React from 'react';
import { StyleSheet, Text, View } from "react-native";
import HomeScreen from './src/HomeScreen';
import SettingsScreen from './src/SettingsScreen';
import { NavigationContainer } from '@react-navigation/native';
import { createNativeStackNavigator } from '@react-navigation/native-stack';

const App = () => {

  const Stack = createNativeStackNavigator();

  return (
    <NavigationContainer>
      <Stack.Navigator>
        <Stack.Screen name="Home" component={HomeScreen} />
        <Stack.Screen name="Settings" component={SettingsScreen} />
      </Stack.Navigator>
    </NavigationContainer>
  );
};

export default App;
We have navigation set up now, but you’ll notice if you look back at your app that we can’t do anything with it. It looks exactly the same as when we put the first put the Home screen into the nav. There’s nothing to click. We need to create some buttons to do the actual screen changing.
Making Navigation Buttons
Every screen in the navigation automatically gets the navigation prop. All you need to do is add the parameter to the parameter list and then it’s available in the function. So on the home screen:
import * as React from 'react';

...

function HomeScreen({ navigation }) { // <= add { navigation } here

...

}
Now, we’ll create a button. Add the button component to the import from React Native:
import { View, Text, StyleSheet, Button } from 'react-native';And then we can place the button directly below our title Text element:
<Button title="Settings" onPress={() => navigation.navigate('Settings')} />Button is a self closing tag. It has a title prop which displays on the button itself (we’ve made it Settings) and it has an onPress prop which we’re using to tell the button what to do when we press it.
In the arrow function in the onPress prop, we’re using the navigation prop we passed into the HomeScreen component to tell the button to send us to the Settings page:
navigation.navigate('Settings')The parameter to that function (‘Settings’) corresponds to the name prop that we set on the Stack.screen line on the App.js component. Here’s that line again:
<Stack.Screen name="Settings" component={SettingsScreen} />Here’s my full HomeScreen.js file:
import React from 'react';
import {View, Text, StyleSheet,Button} from 'react-native';
const HomeScreen = ({ navigation }) => {
return (
<View style={styles.container}>
<Text style={styles.bigTextCenter}>Home Screen</Text>
<Button title="Settings" onPress={() => navigation.navigate('Settings')} />
</View>
)
}
const styles = StyleSheet.create({
container: {
flex: 1,
padding: 24,
backgroundColor: 'lightblue'
},
bigTextCenter: {
textAlign: 'center',
fontSize: 25,
color: 'white',
}
});
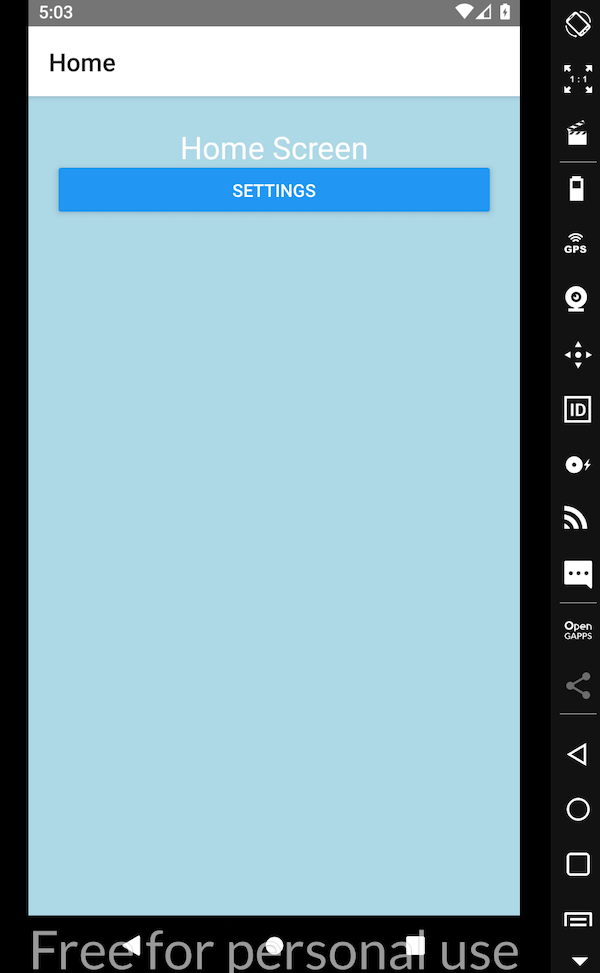
export default HomeScreen;Now when we look at our app we can see the new Settings button:
And when we click on the button, we go to the sassy, salmon settings screen:
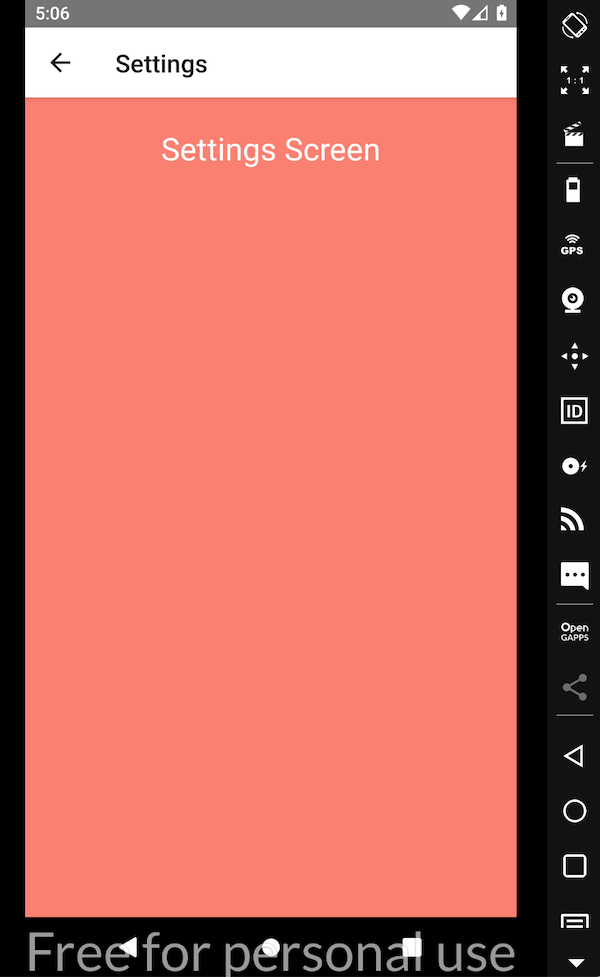
We could go crazy with buttons and add a button to the Settings screen – it would be the same process – but we don’t need to because we’ve now got a back button (<–) that React Navigation is providing to us out of the box.
So that’s the nuts and bolts of setting up React Navigation for React Native. Happy navigating!