
Because I so often write posts where I say, “you should put this code in a custom plugin”, here’s what you can do to create a quick and dirty custom plugin from scratch to follow along with those posts. It’s not a plugin you would release to the world – that would have things like activation, deactivation, uninstall, data cleanup and licensing. But for just getting up and running, this is enough.
Create the Plugin Files
In my /wp-content/plugins/ directory I’ve created a new folder called clario-custom-woocommerce-functionality and inside that a php file of the same name:

The name is up to you and can be anything as long as it doesn’t clash with any of the names of the existing plugins. Good practice is to prefix your plugin name with something that is unlikely to be used by others so that you can avoid exactly that! That’s why I’ve put clario at the beginning of my plugin name.
Add the Plugin Header Information
WordPress uses the header information in the main plugin file to know what it’s dealing with and to display the plugin in the admin plugins screen. This information comes in the form of comments at the head of the file. Here’s an example:
<?php
/*
 * Plugin Name: Woocommerce custom functionality
 * Author: Clare Ivers
 * Author URI: https://clareivers.com
 * Description: Clare's collection of custom woocommerce functionality
 * Version: 0.0.1
 */
You can substitute in your own details over mine.
You don’t need all of these fields but since they tell you which plugin you’re looking at in the WP Admin screens, it’s better to have them. At a minimum you need the Plugin Name line, eg:
/**
 * Plugin Name: Woocommerce custom functionality
 */
There are lots of available header fields with different uses.
Enable the Plugin
Now, in the admin Plugins screen (Dashboard > Plugins) we can see our plugin:
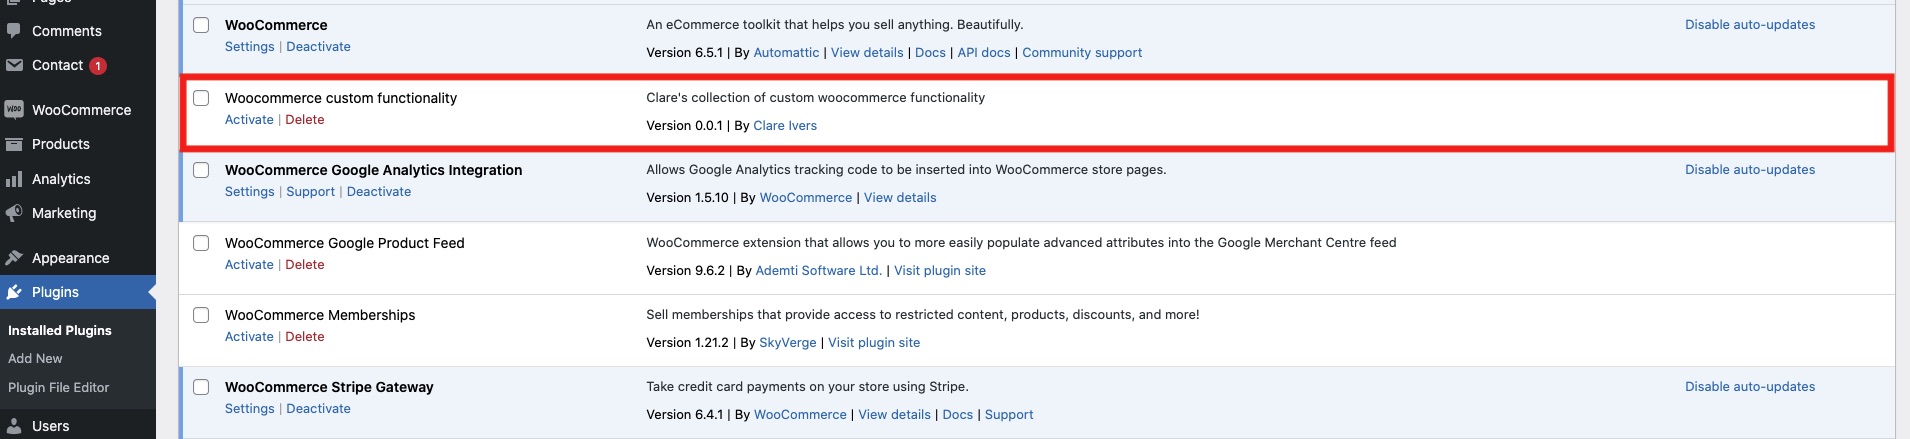
Here we can see that WordPress is using the plugin name, author, link to author URI, description and version from the header information we defined in the main plugin file.
Just click Activate and WordPress will enable the plugin.
Prevent Direct Access
Now, we’ll add a line of code at the top of the main file, directly below the header information to prevent anyone getting direct access to the plugin.
When WordPress loads, it uses a constant called ABSPATH. If that constant is not initialised when our PHP file is accessed then it means it is not being accessed through WordPress, but directly. We only want to let the file be accessible via the site, so we’ll use that constant to restrict access with this line of code:
defined( 'ABSPATH' ) || exit;This is saying, if ABSPATH is not defined, exit the file- literally, ABSPATH is defined OR exit.
This is not strictly necessary to run a plugin but it’s good practice, it’s really easy and it’s something to get into the habit of doing.
Now you’re good to go – happy coding!
The featured image for this post is by Paul Hanaoka on Unsplash