Lately I’ve been building the blog component of my learning games website at Happy Chem Trails. To do it I’m using a headless implementation of a CMS. That is, using the CMS for the backend, but rendering the content from that backend on my React site.
I tinkered with using Strapi because I thought it’d be fun to try something new, but found that all the warnings were correct and I was unable to install it on my shared hosting, so I went back to what I know: WordPress.
Table of Contents
Locking Down the WordPress Site
So I’ve now installed WordPress on a subdomain of my main site and I’ve written a blog post. I don’t want search engines indexing this WordPress installation because I will be showing the content on my React site and I don’t want duplicate content. I’m using the Password Protected plugin to stop the front end from being accessible to search engines (or anyone else).
I’m also removing the sitemap. You can do this using the wp_sitemaps_enabled hook like this in your functions file:
apply_filters( 'wp_sitemaps_enabled', false );If like me you’re using YOAST or another SEO plugin on the WordPress installation, you also need to disable their sitemaps via the plugin’s functionality. In the case of YOAST, you can switch it off on their features page.
The WordPress REST API
I can access my post (and all future posts I create) using the WordPress REST API. There’s a list of the available endpoints here at the the REST API handbook. I want to do this using the ‘posts’ endpoint, which gives me all the published posts on the site, so I can then loop through them on the React side and render out the various titles, images and excerpts, and use the body of the posts for the actual posts. You can view your posts in the browser by inputing this URL:
https://<yourdomain>/wp-json/wp/v2/posts/Getting the Featured Image URL and Alt Text in the Posts API Response
One of the first things you may notice about the output is that it doesn’t contain the URL for the featured image of the post. I need that to show the image on my main blog page. The API has an ID for that image, but that doesn’t help us much from React side of things. We could issue another API call but that would be unnecessary and wouldn’t perform well. Instead we can alter the content of the posts API to include the featured image URL and its alt text. We’ll use the rest_api_init hook to do this and call the register_rest_field function in the callback to it:
I am doing this in a child theme so that when I update my main theme my code is preserved. You could also do it in custom plugin however I don’t think this is necessary in the context of headless WordPress as I’ll never be changing themes since I’m not using the front end of WordPress
add_action('rest_api_init', 'clario_register_featured_images' );
function clario_register_featured_images(){
    register_rest_field( array('post'),
        'featured_image', // featured_image will be the new field name in the API response
        array(
            'get_callback'    => 'clario_get_featured_image',
            'update_callback' => null,
            'schema'          => null,
        )
    );
}
function clario_get_featured_image( $object, $attribute, $args ) { // specified in the 'get_callback' field of register_rest_field
// var_dump($object);
    if( $object['featured_media'] ){
        $img = wp_get_attachment_image_src( $object['featured_media'], 'app-thumb' );
        $alt = get_post_meta( $object['featured_media'], '_wp_attachment_image_alt', true );
        return [$img[0],$alt];
    }
    return false;
}
register_rest_field allows you to specify a get and an update callback and a schema. Here we only need the get callback as we are adding a field.
Within the specified callback I’ve var_dumped the content of the $object parameter and I can see its content when I refresh the output of the API call in the browser. In the var_dump I can see that the ID of the featured image for each post is located in $object['featured_media'].
I’m then using that ID in the call to wp_get_attachment_image_src to get the URL for the featured image and in the call to get_post_meta with a $key argument of _wp_attachment_image_alt to get the alt text for the featured image. I’m packing them into an array and returning them from the function. If not found I’m returning false.
Now when I refresh the endpoint in my browser I can see that the featured image info is there in my featured_image field and I can use it on the React side in an API call.
I have commented out the var_dump as it will break the API call on the React side later if it is left there – it should just be used for debugging purposes.
React Static
I’m using React Static for my React site but whatever flavour of React you’re using, you’ll probably do something similar. What React Static does to generate dynamic content such as posts is define them in its static.config.js file. By default it’s using placeholder data sourced from https://jsonplaceholder.typicode.com/:
  getRoutes: async () => {
    const { data: posts } = await axios.get(
      'https://jsonplaceholder.typicode.com/posts'
    )

    return [
      {
        path: '/blog',
        getData: () => ({
          posts,
        }),
        children: posts.map(post => ({
          path: `/post/${post.id}`,
          template: 'src/containers/Post',
          getData: () => ({
            post,
          }),
        })),
      },
    ]
  },
As you can see it’s getting the data using the Axios HTTP client and looping through the posts to create routes, set the template and get the post data. Out of the box if you go to yourdomain.com/blog/ you’ll get a working blog page with that placeholder data in a list of links that takes you to the individual post pages. But we need to do something a bit different because our data is a different shape.
Changing it to use the WP REST API
I’m going to use the WP REST API here instead (the comments in the code below came with my React Static install):
  getRoutes: async () => {
    const { data: posts } = await axios.get(
      "https://<yourdomainhere>/wp-json/wp/v2/posts/" //swap out your domain here
    );
console.log(posts);
    return [
      {
        // React Static looks for files in src/pages (see plugins below) and matches them to path
        path: "/blog",
        // function that returns data for this specific route
        getData: () => ({
          posts
        }),
        // an array of children routes
        // in this case we are mapping through the blog posts from the post variable above
        // and setting a custom route for each one based off their post id
        children: posts.map(post => ({
          path: `/${post.slug}`,
          // location of template for child route
          template: "src/containers/Post",
          // passing the individual post data needed
          getData: () => ({
            post
          })
        }))
      },
    ]
  },
I’ve changed the URL in the call to axios.get to the URL of the REST API at my WordPress install. You can do the same with your domain swapped in.
I’ve also changed the path for the custom route to use post.slug so that instead of having /blog/post/1 as the URL (not easy for users to read and remember) I can have a structure of /blog/<slug> (where <slug> is my WordPress slug grabbed from the API). This change will break the blog page and posts – we need to change some other stuff to make it work.
Blog Page Code
The file that React Static is using to create the main blog page is as follows:
import React from 'react';
import { useRouteData } from 'react-static';
import { Link } from 'components/Router';

export default function Blog() {
  const { posts } = useRouteData();
  return (
    <div>
      <h1>It's blog time.</h1>
      <div>
        <a href="#bottom" id="top">
          Scroll to bottom!
        </a>
      </div>
      <br />
      All Posts:
      <ul>
        {posts.map(post => (
          <li key={post.id}>
            <Link to={`/blog/post/${post.id}/`}>{post.title}</Link>
          </li>
        ))}
      </ul>
      <a href="#top" id="bottom">
        Scroll to top!
      </a>
    </div>
  )
}
I need to change it to get my preferred URL structure and to add the featured image data:
// src/pages/blog
import React from 'react';
// provides the route's data
import { useRouteData } from 'react-static';
import { Link } from 'components/Router';
import parse from 'html-react-parser';
import { sendGA } from '../components/functions';

// making a ul of links to all of the individual blog posts
export default function Blog() {
  const { posts } = useRouteData();
console.log('posts = ',posts);
  return (
    <div id="blog-page">
      <div>
        <a href="#bottom" id="top">
          Scroll to bottom!
        </a>
      </div>
      <br />
      <ul id="blog-page-ul">
        {posts.map( (post,idx) => {
          return (
            <div key={idx} id="blog-container">
              <Link onClick={() => sendGA('/blog/'+post.slug) } to={'/blog/'+post.slug}>
                <h1>{post.title.rendered}</h1>
                <img
                  alt={post.featured_image[1]}
                  src={post.featured_image[0]}
                  />
              </Link>
              {parse(post.excerpt.rendered)}
            </div>
          )
        })}
      </ul>
      <a href="#top" id="bottom">
        Scroll to top!
      </a>
    </div>
  )
}
In the above code I’ve changed the Link to point to the URL '/blog/'+post.slug and included in the alt and src parameters of the img tag the two elements of the featured_image array that I created in the register_rest_field function.
Now when I go to <mydomain>/blog I get the featured image output on the page (where mydomain is the URL of my React site):
You’ll have to take my word for it that this image has an alt text value set, but it does!
Post Template
I need to change the posts to accommodate the API response too. In the template located at src/containers/Post, I can output the data on the main blog page (remember this template is defined back in the static.config.js file).
The post title and post content is located in the response from the REST API in post.title.rendered and post.content.rendered so I need to include these in my code. I’ve done that in the Post template below. The way React Static ships, it just outputs the post content in a paragraph tag (second line highlighted in orange):
const Post = props => <div className="single-post" {...props} />

export default () => {
  const { post } = useRouteData();
console.log(post);
  return (
    <Post>
      <Link to="/blog/">{'<'} Back</Link>
      <br />
      <h3>{post.title.rendered}</h3> // changed from React Static value of post.title
      <p>{post.content.rendered}</p> // changed from React Static value of post.body
    </Post>
  )
}
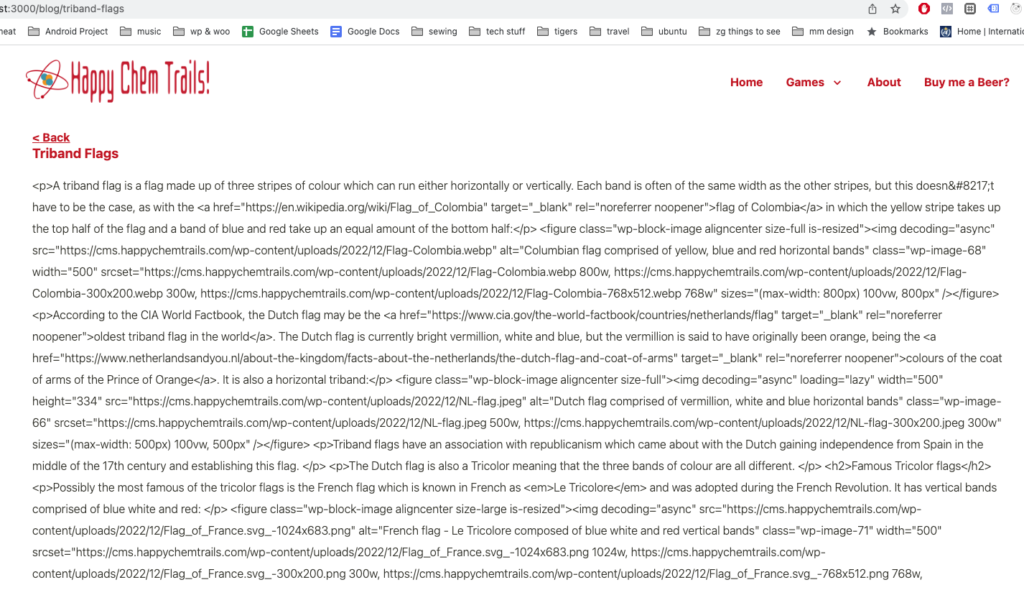
But that won’t work here because what I’m getting back from WordPress is a long string of HTML, and that’s what I’ll see on my post rather than rendered HTML:
So I need something to render the HTML instead of just printing it out. html-react-parser to the rescue! Just install it as you normally would using npm:
npm install html-react-parser --saveor yarn:
yarn add html-react-parser
and then you can use the parse() function to parse out the HTML:
import React from 'react';
import { useRouteData } from 'react-static';
import { Link } from '@reach/router';
import parse from 'html-react-parser'; // import parser

const Post = props => <div className="single-post" {...props} />

export default () => {
  const { post } = useRouteData();
console.log(post);
  return (
    <Post>
      <Link to="/blog/">{'<'} Back</Link>
      <br />
      <h1>{post.title.rendered}</h1>
      {parse(post.content.rendered)} // use parse() to render html
    </Post>
  )
}
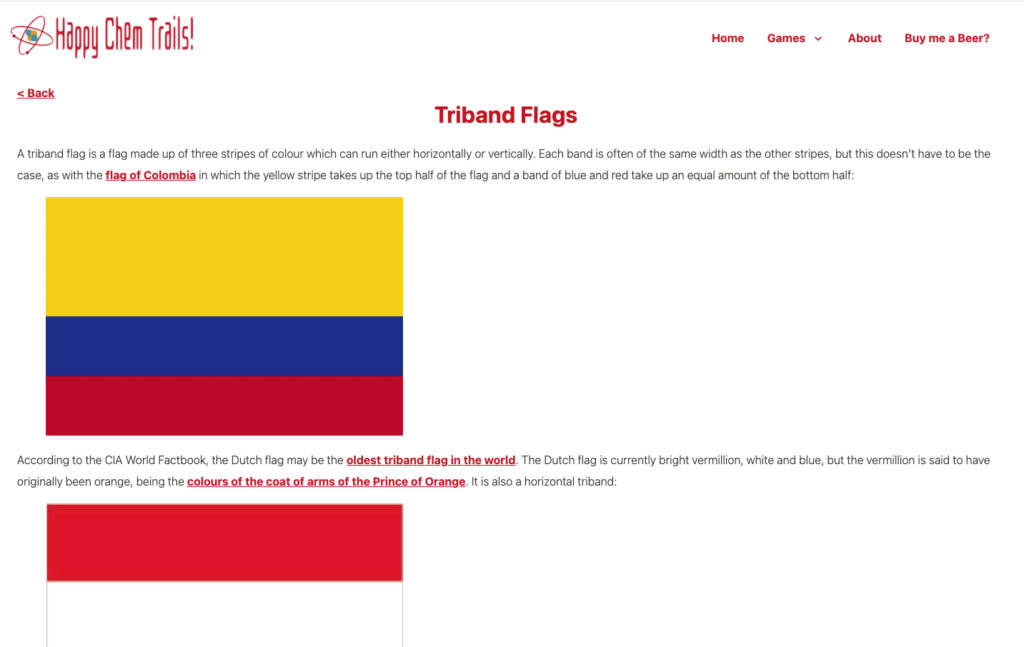
Now I’m getting the content on the page as I want it (well, sans styling):
Now we have a basic implementation up and running of headless WordPress on a React site, and any time we publish a new post, it will be included in the React site! Apply styling to your heart’s content!
The featured image for this post is by Oak & Bond Coffee Co. on Unsplash


