
Now that we have a spreadsheet that is receiving incoming data, we can hook it up to one of WooCommerce’s built in web hooks. In this case we’ll use the Order Updated hook because that’s useful info you might want to have in a spreadsheet. That hook fires every time the status of an order is changed.
About WooCommerce Webhooks
WooCommerce builtin webhooks are events that fire when certain actions in WooCommerce are carried out, such as
- Coupon created, deleted, updated or restored,
- Customer created, updated or deleted,
- Order created, deleted, updated or restored,
- Product created, deleted, updated or restored and
- Action
The last one, Action, is generic and what will be using later to create our custom webhook, however for now, we’re just going to use Order Updated to get the functionality working between WooCommerce and Google Sheets.
Webhooks are similar to APIs except that with an API, you call it when you want some data. With a webhook, it sends data to you when something of note occurs. You can read more about the webhooks in WooCommerce here.
How to set up the Webhook
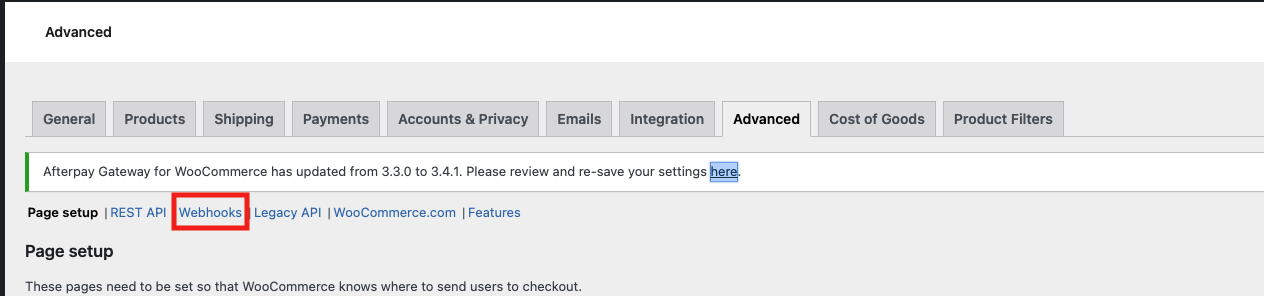
In the WordPress back end, go to Dashboard > WooCommerce > Settings > Advanced Tab and then click on Webhooks in the list of links at the top of the page:
You’ll get a page like this:
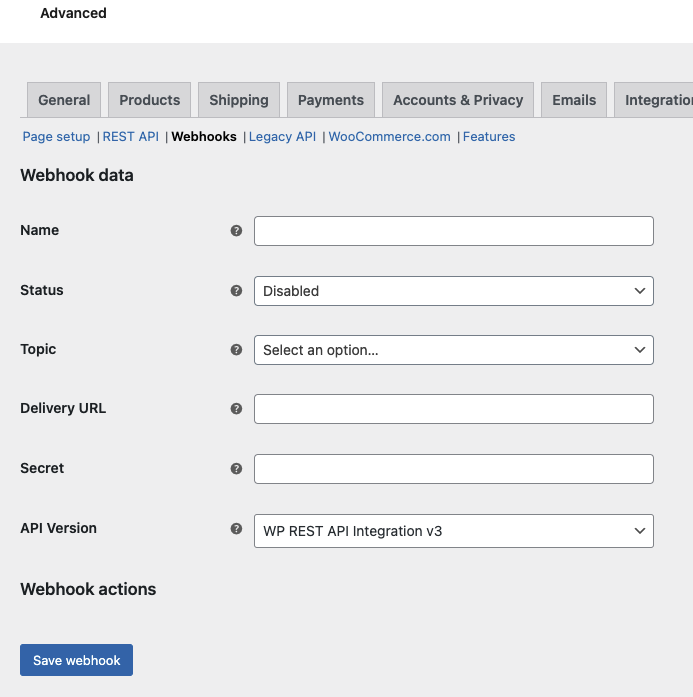
Fill in the details:
- Name – up to you. Make it something descriptive so that you can see what it is in the list of webhooks
- Status – Active
- Topic – Order updated. This is what tells WooCommerce which data to send to the receiving URL and when to send it. Order updated fires when the status on an order is changed in the back end eg, when someone changes the order from on hold to processing. The related data is sent to the receiving URL in a ‘payload’. We are subscribing to it here by choosing it in the dropdown.
- Delivery URL – see below
- Secret – you can leave it blank – WooCommerce will fill it out for you
- API Version – leave as is at v3 at the time of writing
You could use Order created if you want to get that data. Order created fires when someone completes the checkout process and the order is created in the back end. I’m using the Order updated event however because for testing I don’t have to go through the labour intensive process of creating a new order through the checkout to test changes. With Order updated, I can just change the status of an order to make the hook fire.
Set the delivery URL
This will only work if you have been through the process detailed in this post. Do this first!
Back in your Google spreadsheet, go to Main Menu > Extensions > App Script, click on Deploy and select Manage deployments from the resulting dropdown.
A modal will pop up and in the Configuration pane, you’ll see a URL for the app. Click the copy button to copy the URL and past it into the Delivery URL field.
This is pretty similar to what I described in the post about creating the app so I haven’t gone into it in detail here, but you can look back at that post if it’s not working for you.
Errors on the Webhook
If the URL you’ve entered into the Delivery URL field is not accessible WooCommerce will actually tell you that with an error message at the top of the screen:
Error: Delivery URL cannot be reached: A valid URL was not provided.In this case, you need to go back to your App script, do a completely fresh deployment and copy the new URL back into the Delivery URL field of the webhook.
I also got the folowing error when I first set up the webhook, but it disappeared on refresh, so just refresh the page if you encounter it:
Error: Delivery URL returned response code: 400Testing the Webhook
To test the webhook is working, go to an existing order in the order edit screen on the back end and update the status on it. If you don’t have any existing orders, just create one, and then update its status. What you should then see is a new record in your Google sheet that contains all the information attached to the order, all squashed into one cell. If you don’t get any new data in the spreadsheet then you’ll need to troubleshoot it.
If you do have new data, now you need to parse it out into atomic values.
Parsing the Order Update Data
There’s a huge amount of data in the order update record. I’m just going to pull out a few choice bits so you can see how to do it, and then you can get all the other bits that you want.
Back in the doPost function we created in the Google App Script editor in the previous post, we can add some code to split the data up. This is my new doPost function:
function doPost(e) {

  const contents  = JSON.parse([e.postData.contents]);

  let sheet = SpreadsheetApp.getActiveSheet();
  sheet.appendRow([contents.date_created,contents.id,contents.status,contents.total]);

  return ContentService.createTextOutput('Success!');
}
You can see it uses JSON.parse to get the contents element that is nested in the data that the webhook is sending to Google. Contents is where the main data about the order is. Now it’s possible to use dot notation to get any data element out of the contents and append it to a new row in the sheet, which is happening in this line:
sheet.appendRow([contents.date_created,contents.id,contents.status,contents.total]);In my spreadsheet I’m now getting the following data (I added the header record manually):
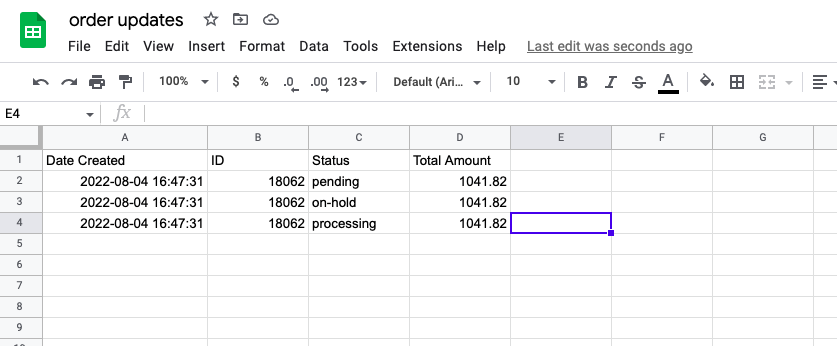
You can modify this to get any kind of the data you want out of the contents. If you’re here and you’ve got data in your spreadsheet, then there’s no need really to read on, however if you have any problems, the rest of this post tells you how you can start to troubleshoot them.
How to tell if the webhook is firing – Webhook Logs
If you don’t get an error on the webhook configuration page and yet nothing is showing up in your spreadsheet it can be very difficult to work out where the problem is – it’s just a silent, meaningless failure.
The first thing to do is find out if the webhook is even firing. You can view webhook logs by going to WooCommerce > Status > Logs. Once there, choose the relevant log with webhooks-delivery- in the suffix of the file name. Then click the view log button next to the dropdown. The log will be displayed in the screen.
But better and easier still is to tail the log file from the command line so that you don’t have to refresh the log page. (Just remember that WooCommerce rolls the log files daily, so if you are seeing nothing being written to the log file, then you might be looking at an old file).
Tailing the log file
First find the file by issuing a find command from the command line. Copy the name of the log file you want from the top of the log screen and run this command, swapping out my log file name for yours:
find . -name webhooks-delivery-2022-08-04-5892170a29cf13b70a1d9de88232d292.logThen cd to the directory:
cd public/wp-content/uploads/wc-logs/Those log files are always in this directory, but if you run find, you don’t have to remember that
Then tail the file:
tail -f webhooks-delivery-2022-08-04-5892170a29cf13b70a1d9de88232d292.log Within the file, you should see logging happening if the hook is firing, and it should contain error messages if there is an error. There is a good list of error scenarios in this Stack Exchange post. One thing to always remember to try is redeploying the app and copying the new URL into the Delivery URL field.